

The Date Picker in EasyFlow adds a calendar field to your Shopify product page so customers can choose a date before they add the product to cart. The selected date travels with the order, so you always know when a customer wants their delivery, pickup, booking or event.
With the Date availability settings, you decide exactly which dates are selectable: set the earliest and latest dates, block specific days of the week, block individual dates and add public holidays in one click. This stops customers from picking dates you cannot fulfil.
Note: The Date Picker option type is available to all EasyFlow users. The Date availability settings are a PRO feature. To unlock them, upgrade to EasyFlow PRO. See How to Upgrade the EasyFlow Plan?
Follow this guide to learn how to create a Date Picker option, control which dates customers can choose and show it on your product page.
When Should You Use a Date Picker? #
A date picker fits any product where when matters as much as what. Common Shopify use cases include:
- Delivery date scheduling: Flowers, cakes, gift boxes and meal kits that must arrive on a specific day.
- Local pickup and click-and-collect: Let customers choose the day they will collect their order from your store.
- Bookings and appointments: Classes, workshops, rentals, tours or service slots sold as products.
- Event and occasion dates: Birthdays, weddings or anniversaries for personalised products, so you can plan production around the event.
- Made-to-order lead times: Keep the earliest date a few days out so your team has time to produce and ship.
Paired with Date availability, the Date Picker also reduces support tickets and failed deliveries, because customers can only pick days you actually operate.
How to Add a Date Picker Option to a Product? #
To add a Date Picker to your Shopify product page, open the EasyFlow app from your Shopify admin dashboard.
Step 1: Create a New Option #
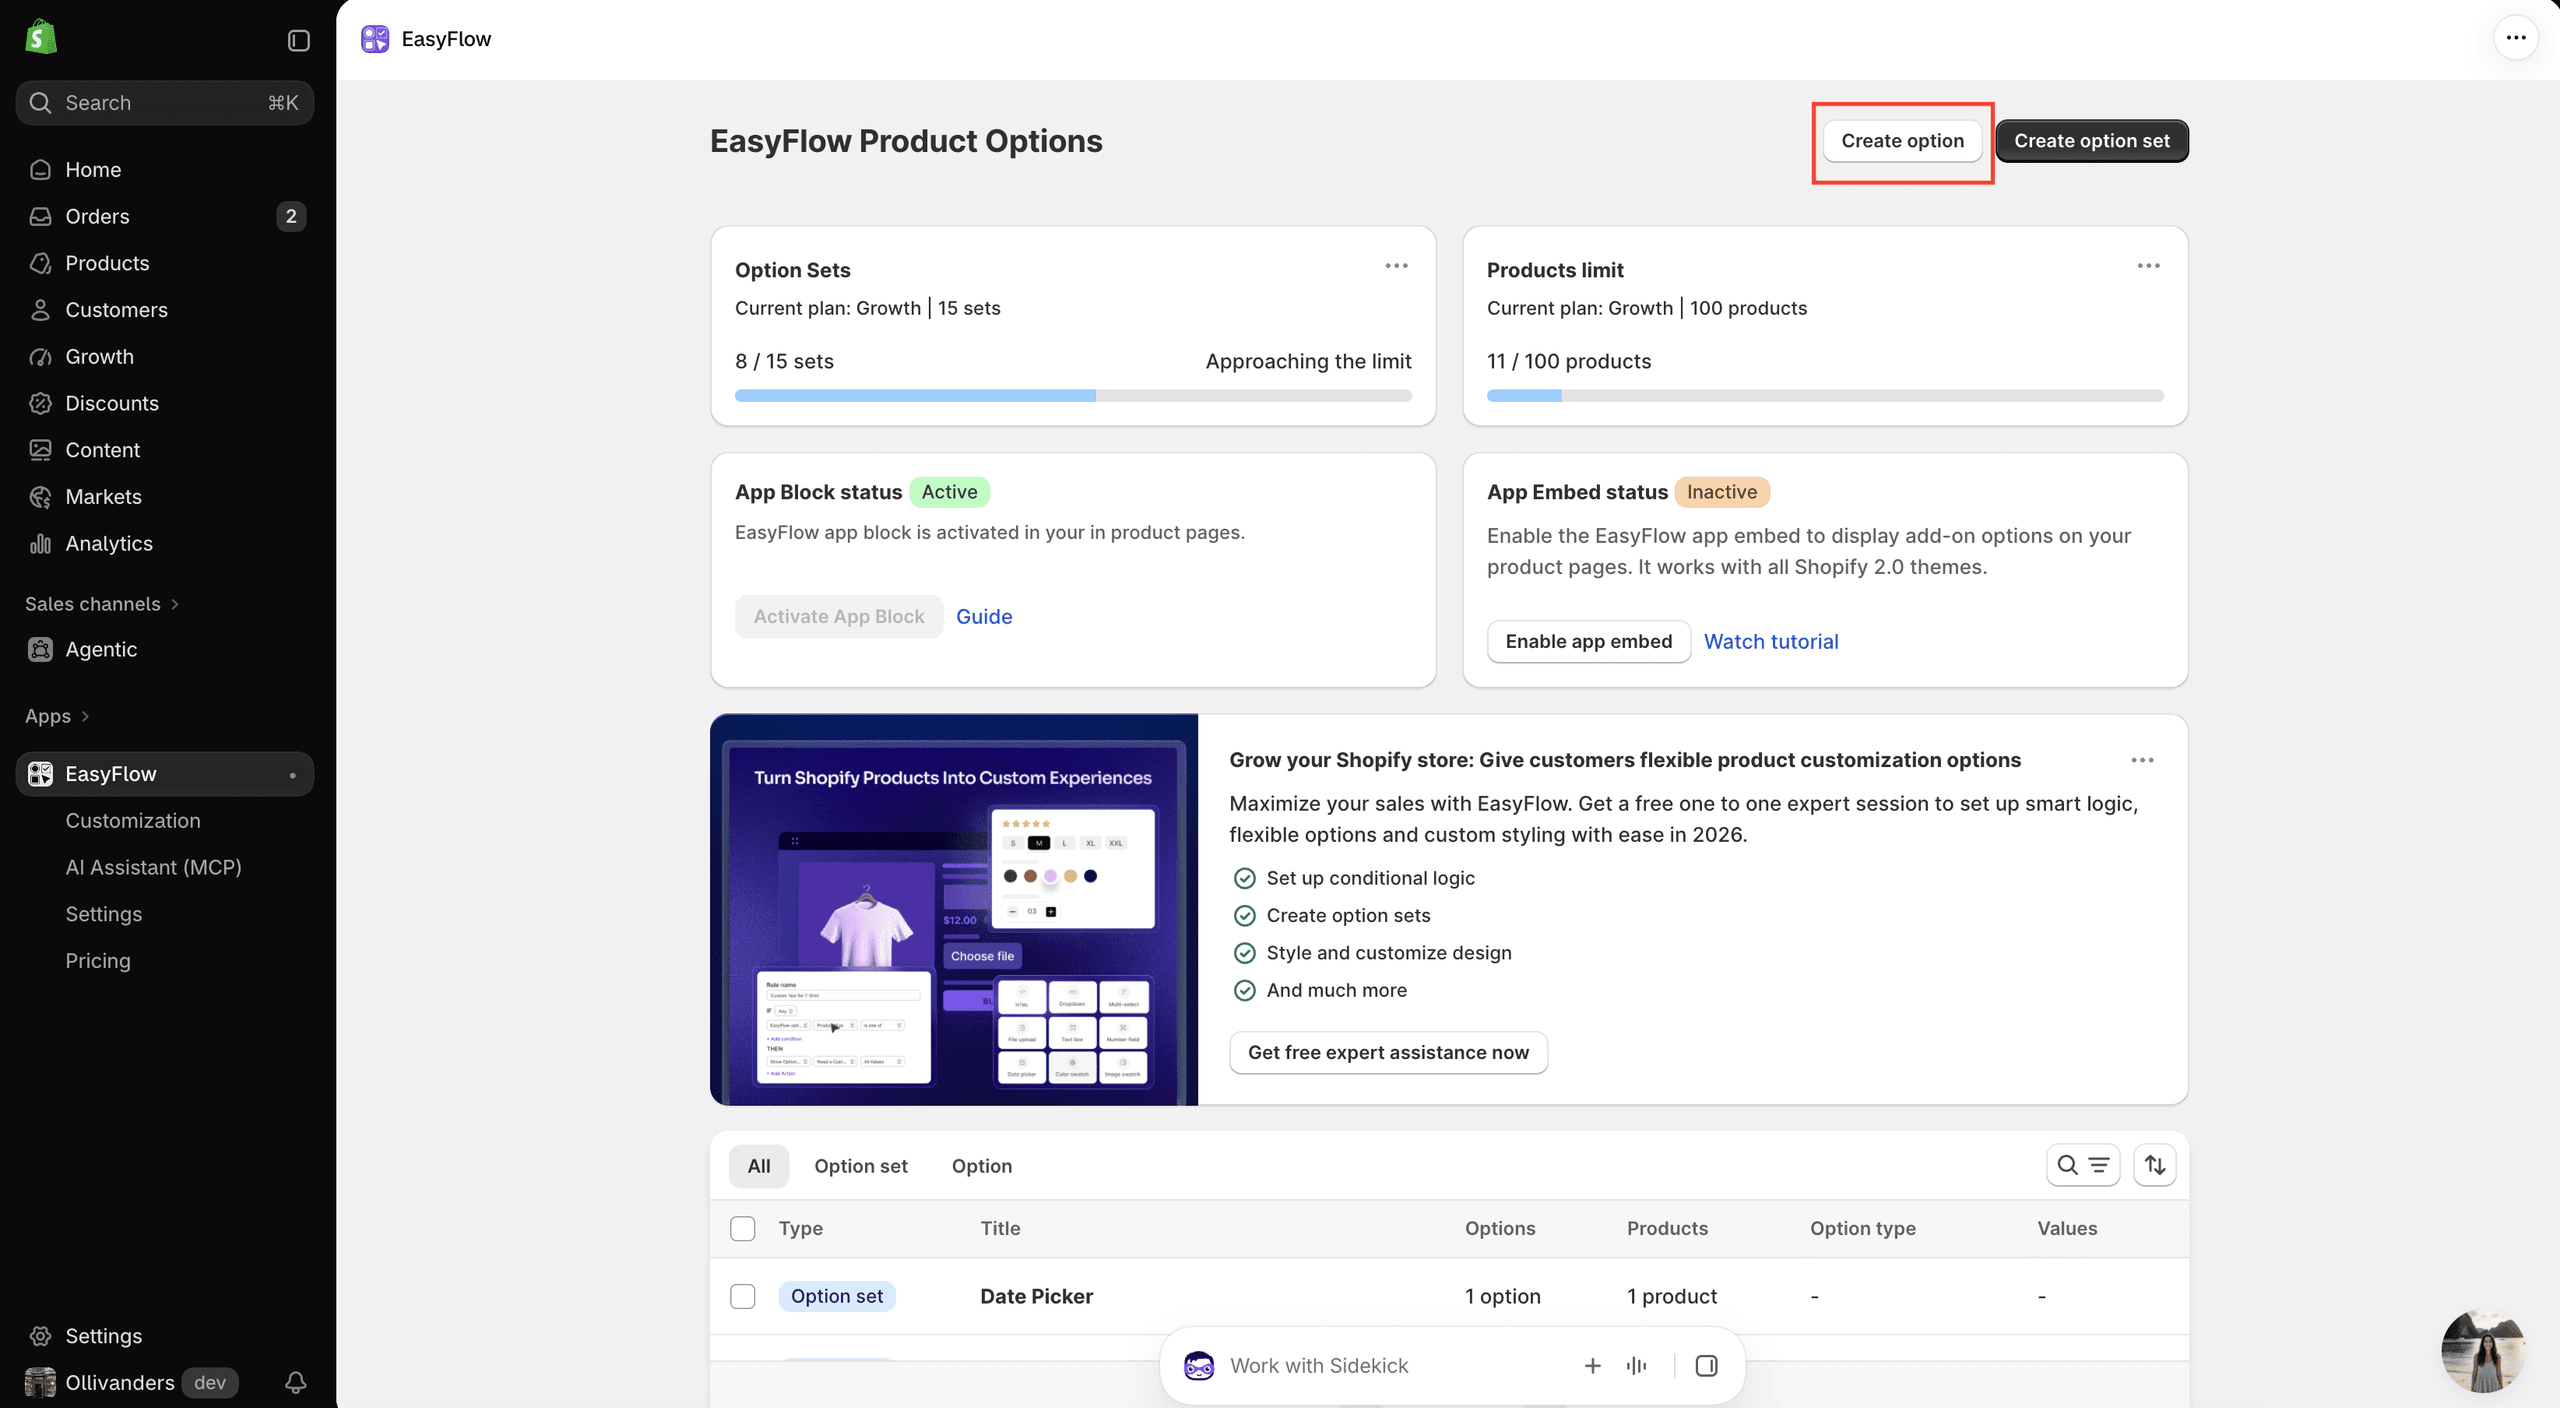
From the EasyFlow Product Options page, click the ‘Create option’ button in the top right corner. You can also open an existing option set and add the Date Picker there.
Step 2: Select the Date Picker Option Type #
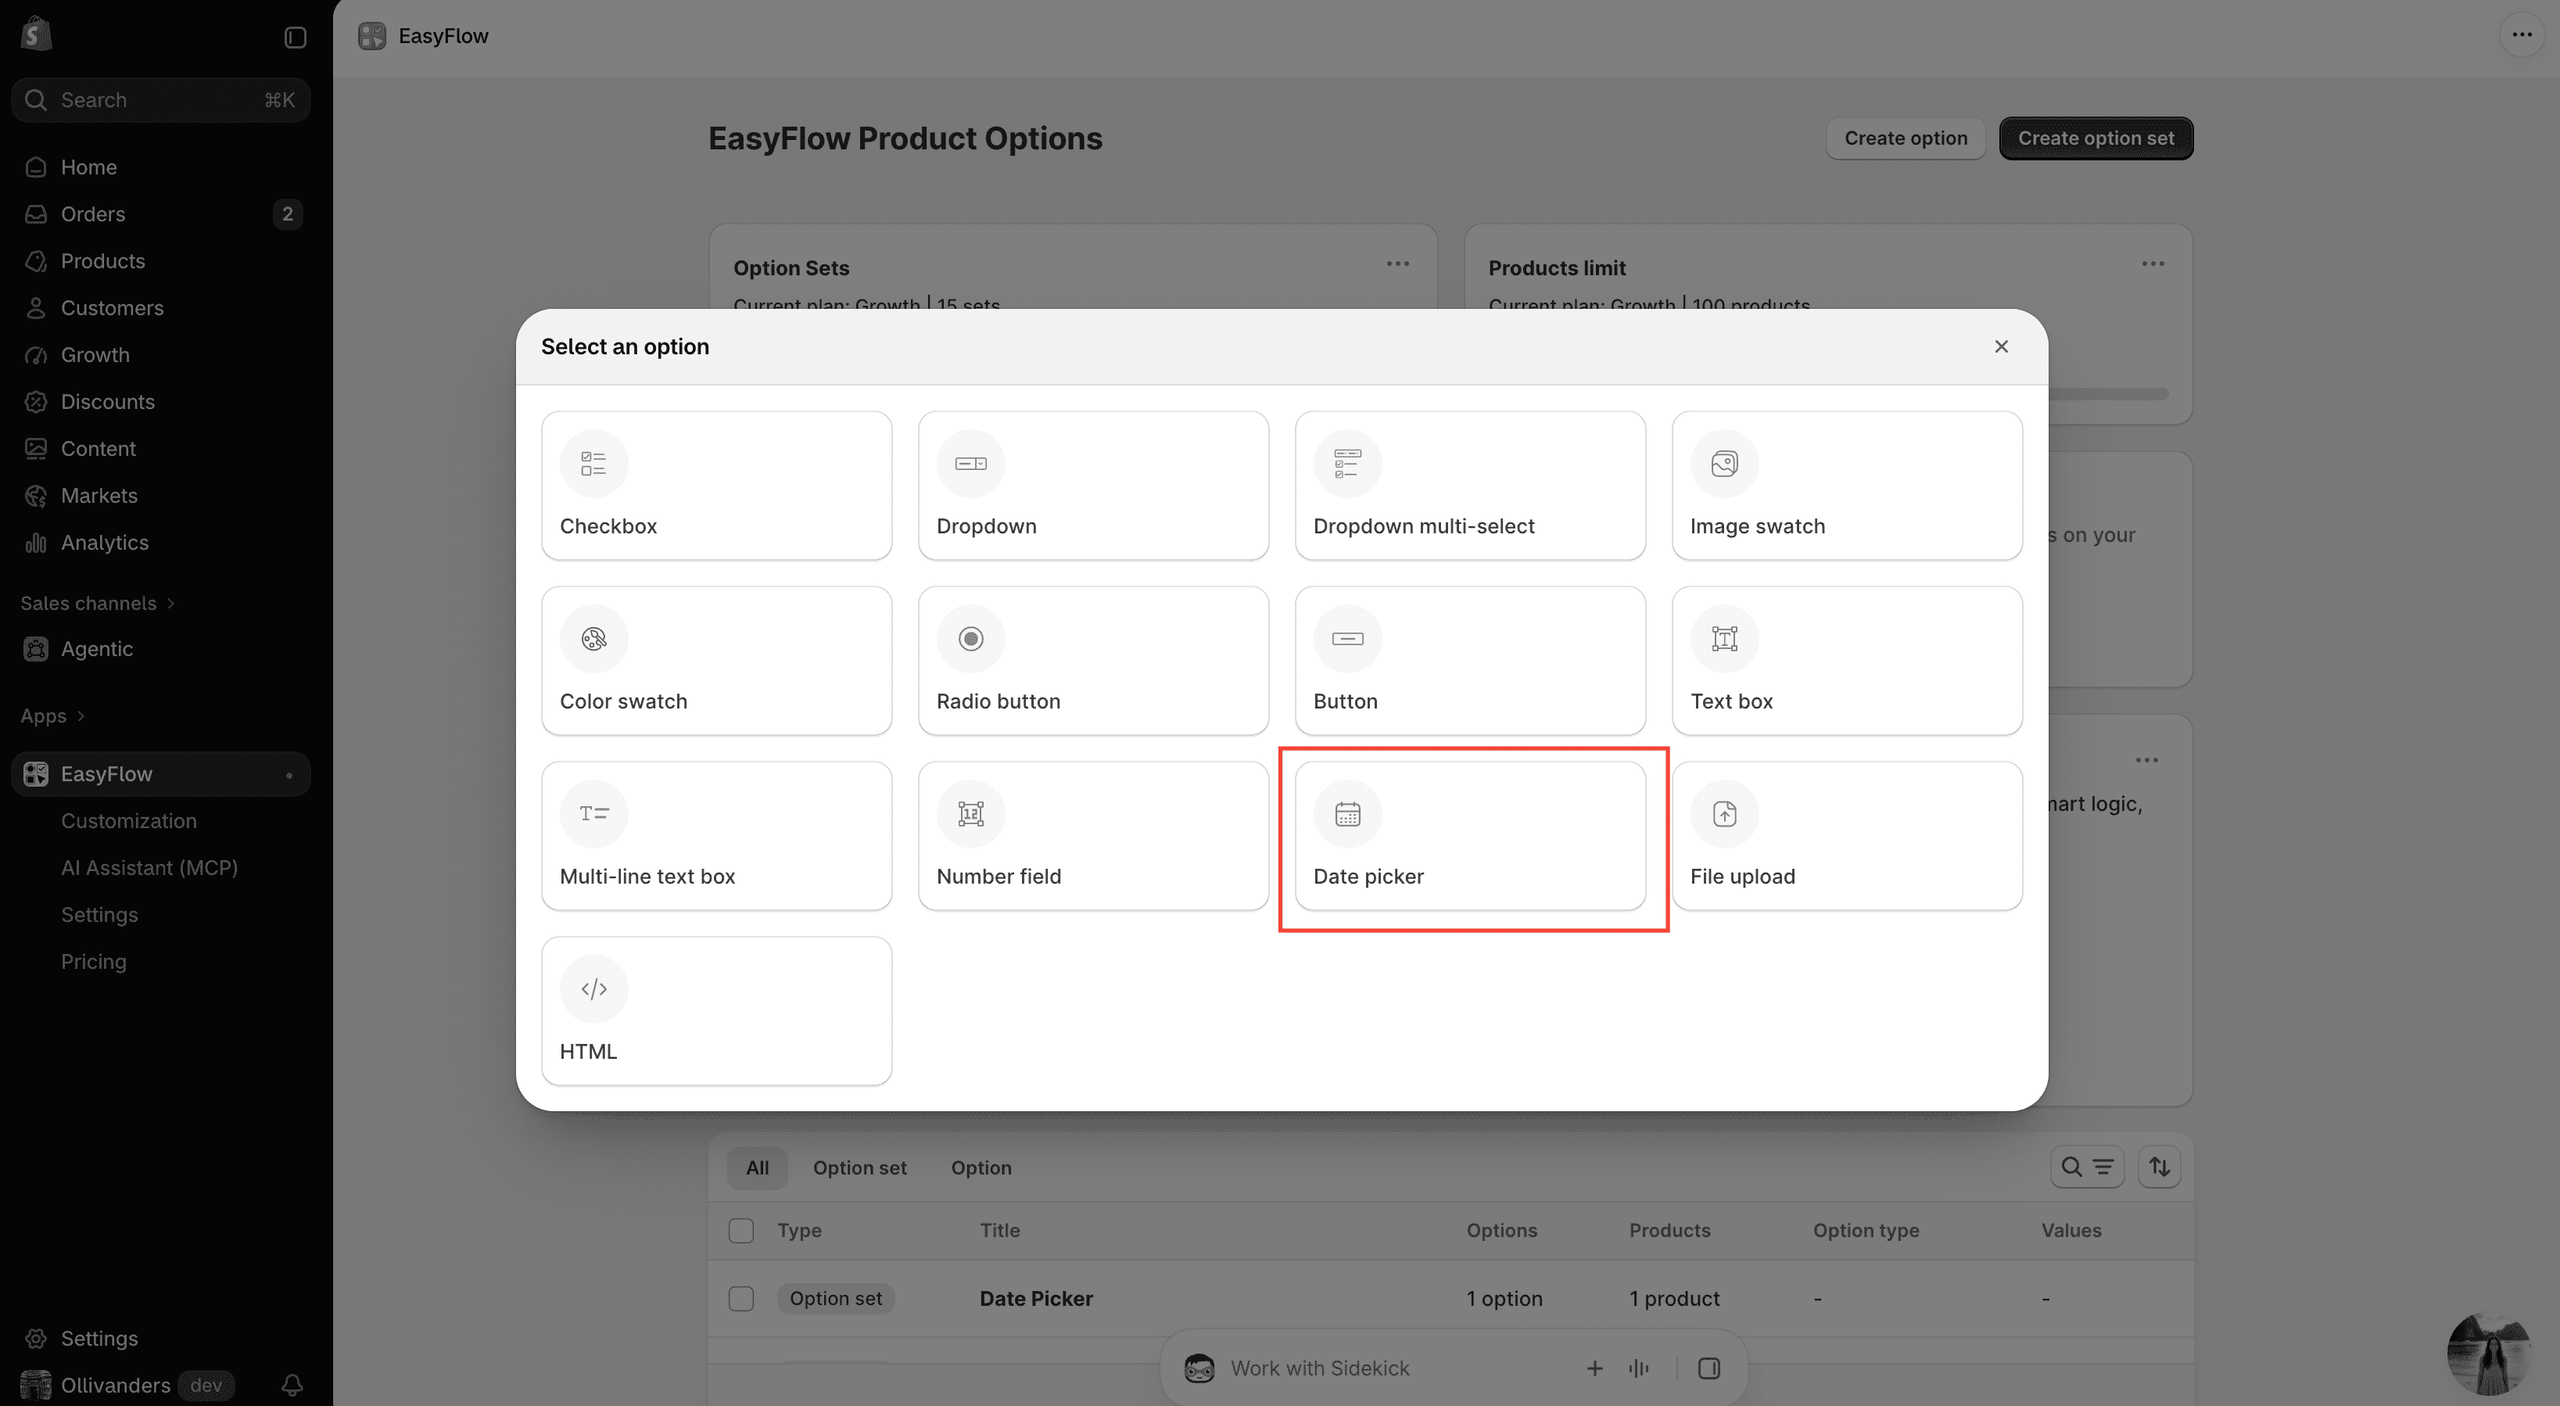
A ‘Select an option’ popup will appear with all available option types. Click ‘Date picker’.
Step 3: Add the Option Name and Price #
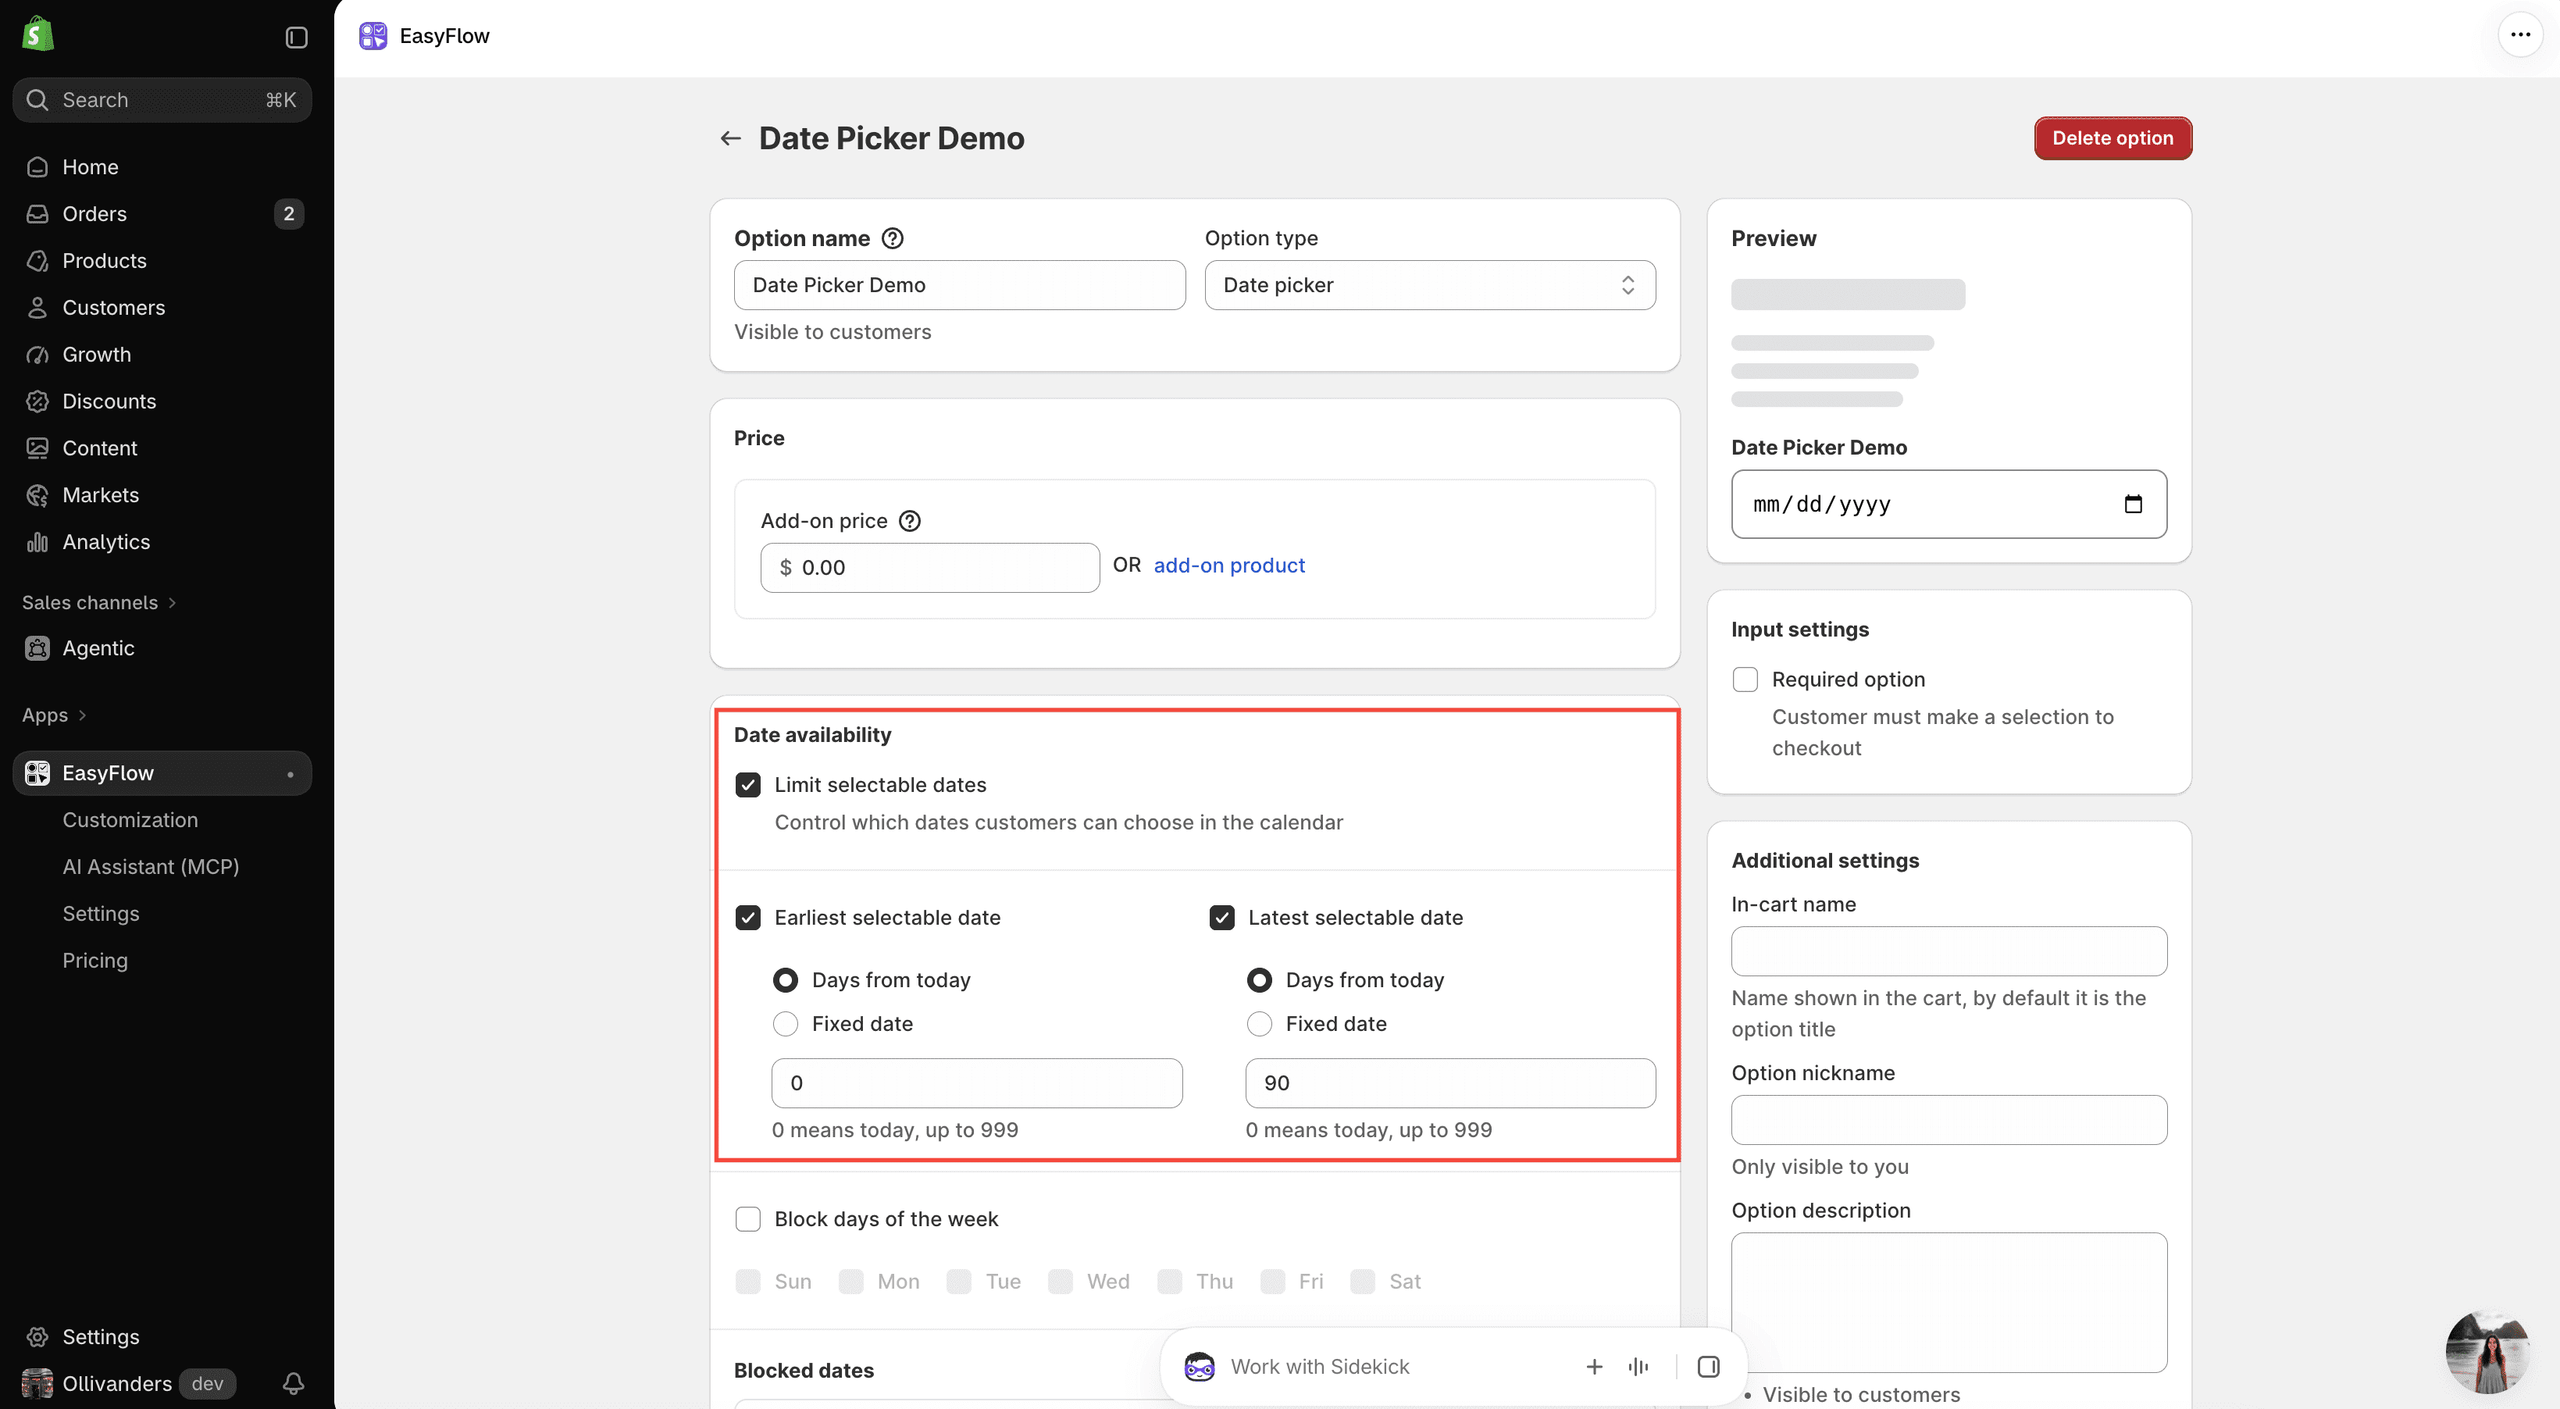
Enter an Option name, for example Delivery Date or Pickup Date. This name is visible to customers on the product page and the Option type will already be set to Date picker.
Next, set the Price if choosing a date should cost extra:
- Add-on price: Enter a fixed amount, such as $5.00 for scheduled delivery. Leave it at $0.00 if the date is free to choose.
- Add-on product: Alternatively, link an existing add-on product to charge for the selection. See How to Create Price Add-ons Using EasyFlow App?
As you configure the option, the Preview panel on the right shows how the date field will look on your storefront, including a short summary of the dates customers can choose.
How to Control Which Dates Customers Can Choose? (PRO) #
Scroll down to the Date availability section. By default, customers can pick any date in the calendar. Tick ‘Limit selectable dates’ to control which dates are available.
Note: Date availability is a PRO feature. If you are not on EasyFlow PRO, you will be asked to upgrade before these settings can be used.
Set the Earliest and Latest Selectable Date #
Once ‘Limit selectable dates’ is ticked, two settings appear side by side:
- Earliest selectable date: The first date a customer can pick.
- Latest selectable date: The last date a customer can pick.
For each one, choose how the date is calculated:
- Days from today: A rolling window that moves forward every day. Enter a number of days, where 0 means today.
- Fixed date: A specific calendar date, useful for seasonal campaigns or one-off events.
Example:
If you set Earliest = 0 days from today and Latest = 31 days from today:
- Customers can pick any date from today up to 31 days ahead.
- The Preview shows: Earliest: today. Latest: 31 days from today.
Tip: Set the earliest date to 2 or 3 days from today if you need preparation time before delivery or pickup.
Block Days of the Week #
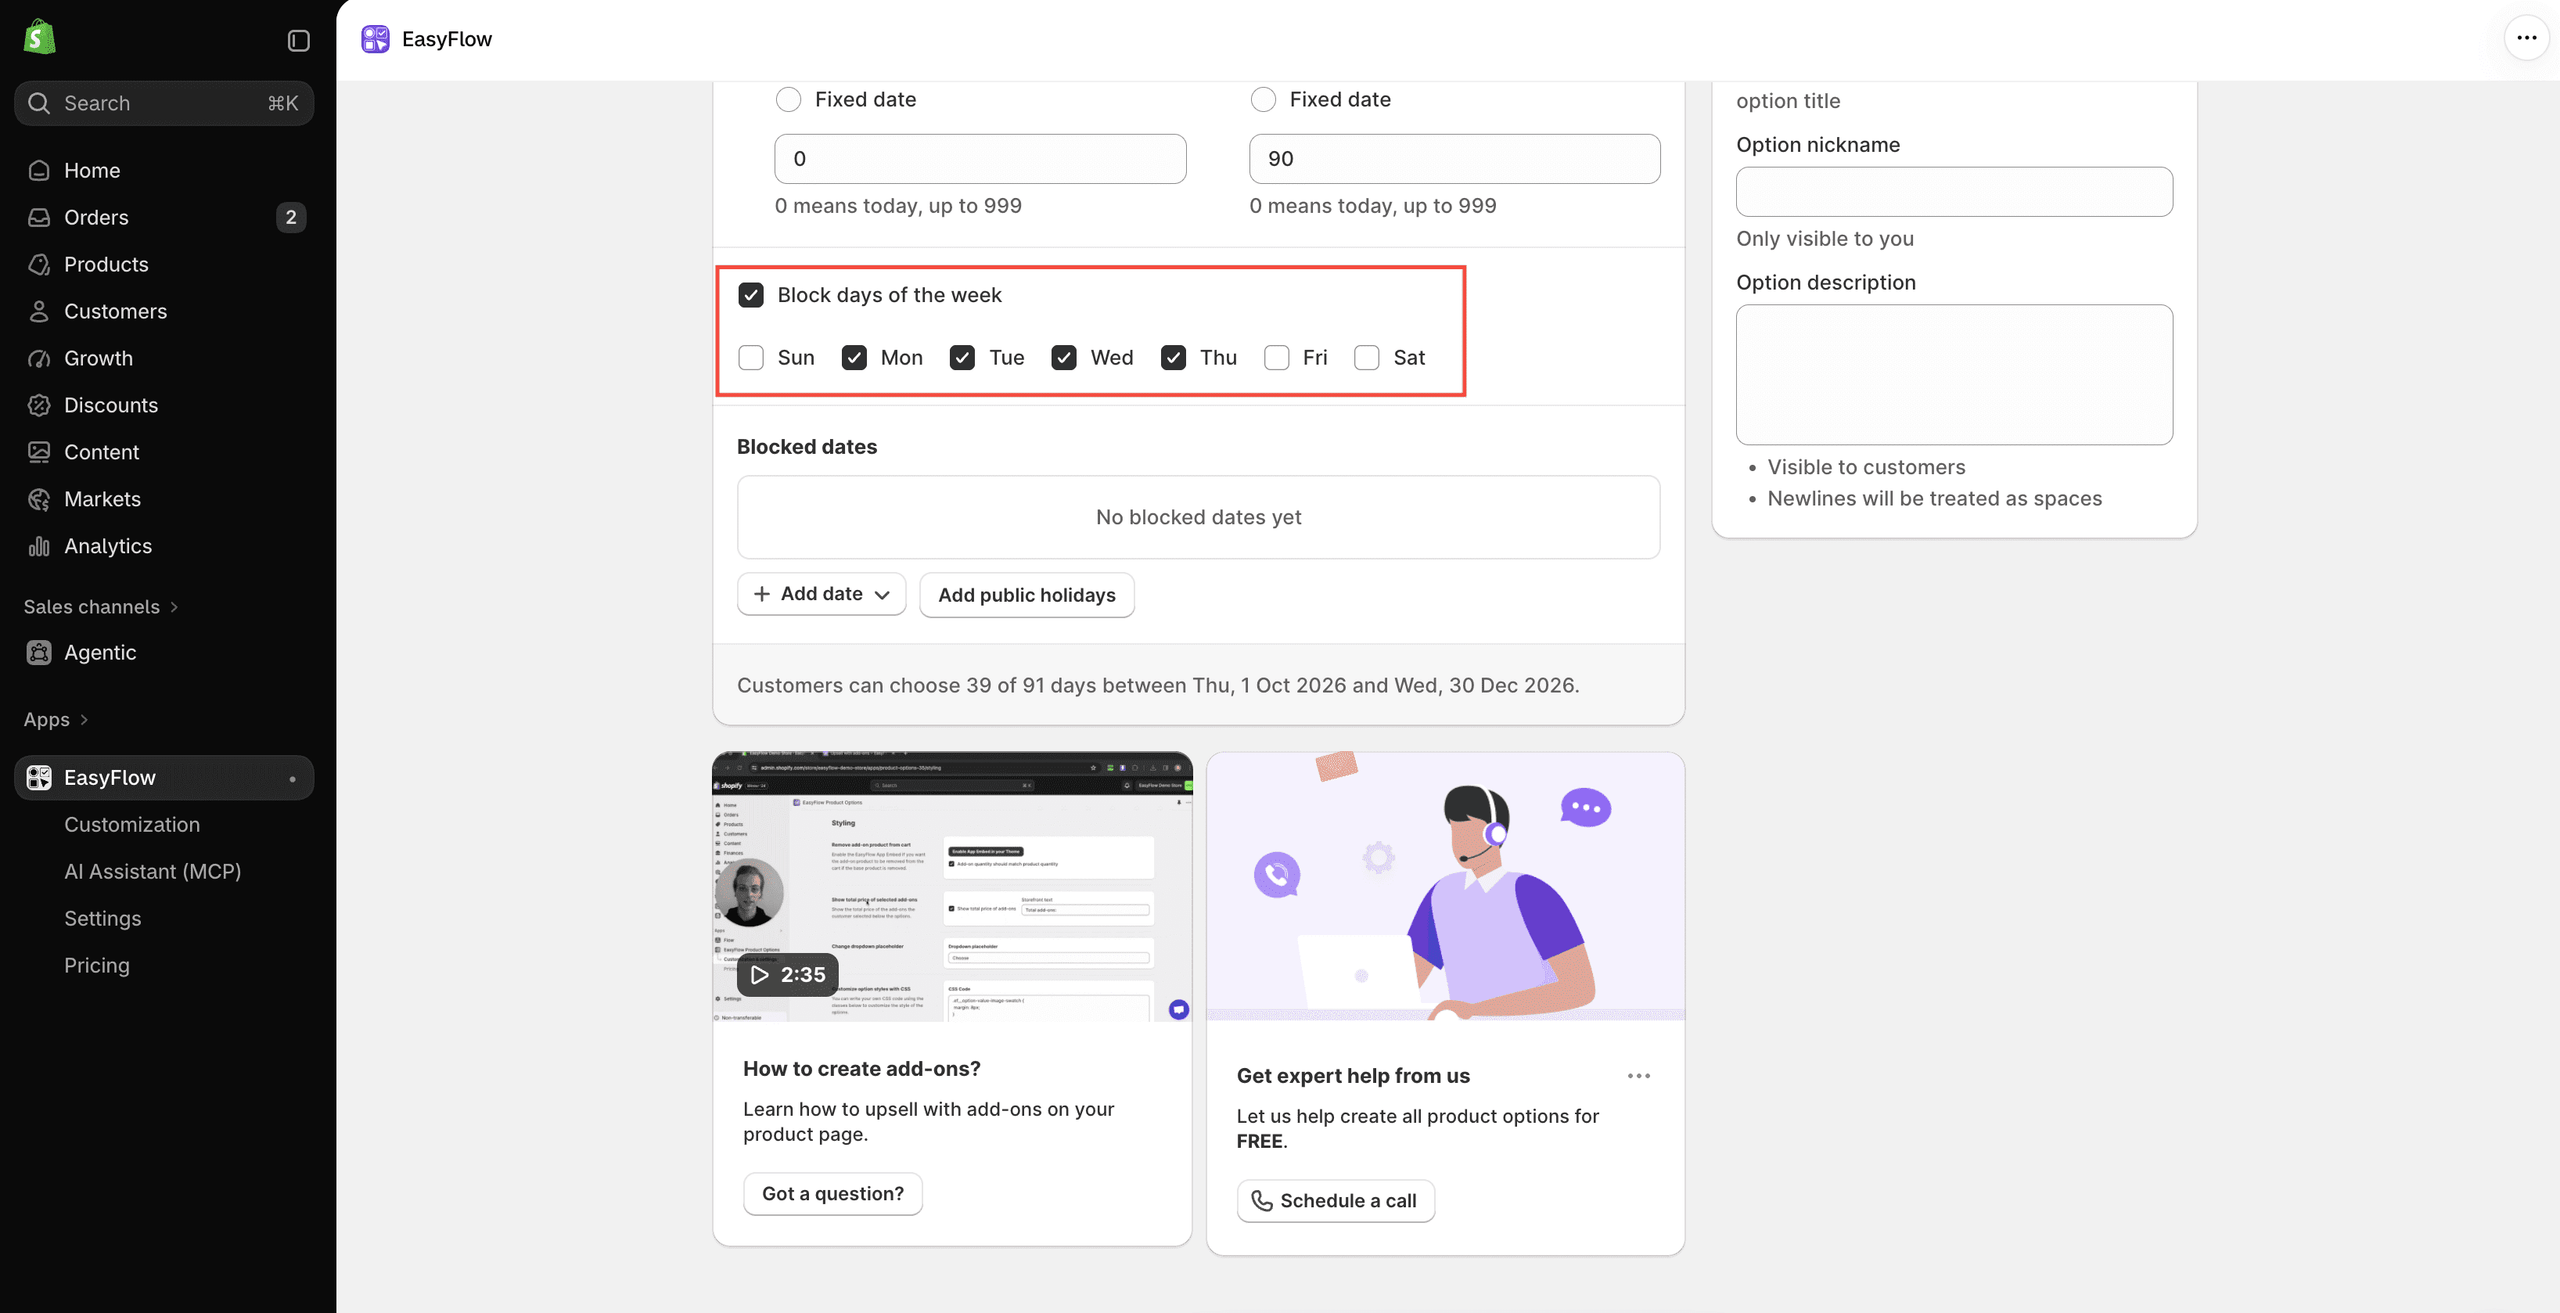
If you do not deliver or open on certain days, tick ‘Block days of the week’ and select the days to block: Sun, Mon, Tue, Wed, Thu, Fri or Sat. Blocked weekdays are greyed out in the customer’s calendar across the whole date window.
Example:
Blocking Tue, Wed and Thu within a 32-day window leaves customers with 18 of 32 selectable days.
Block Specific Dates #
Use Blocked dates to close off individual days, such as a stock-take day, a staff holiday or a fully booked date.
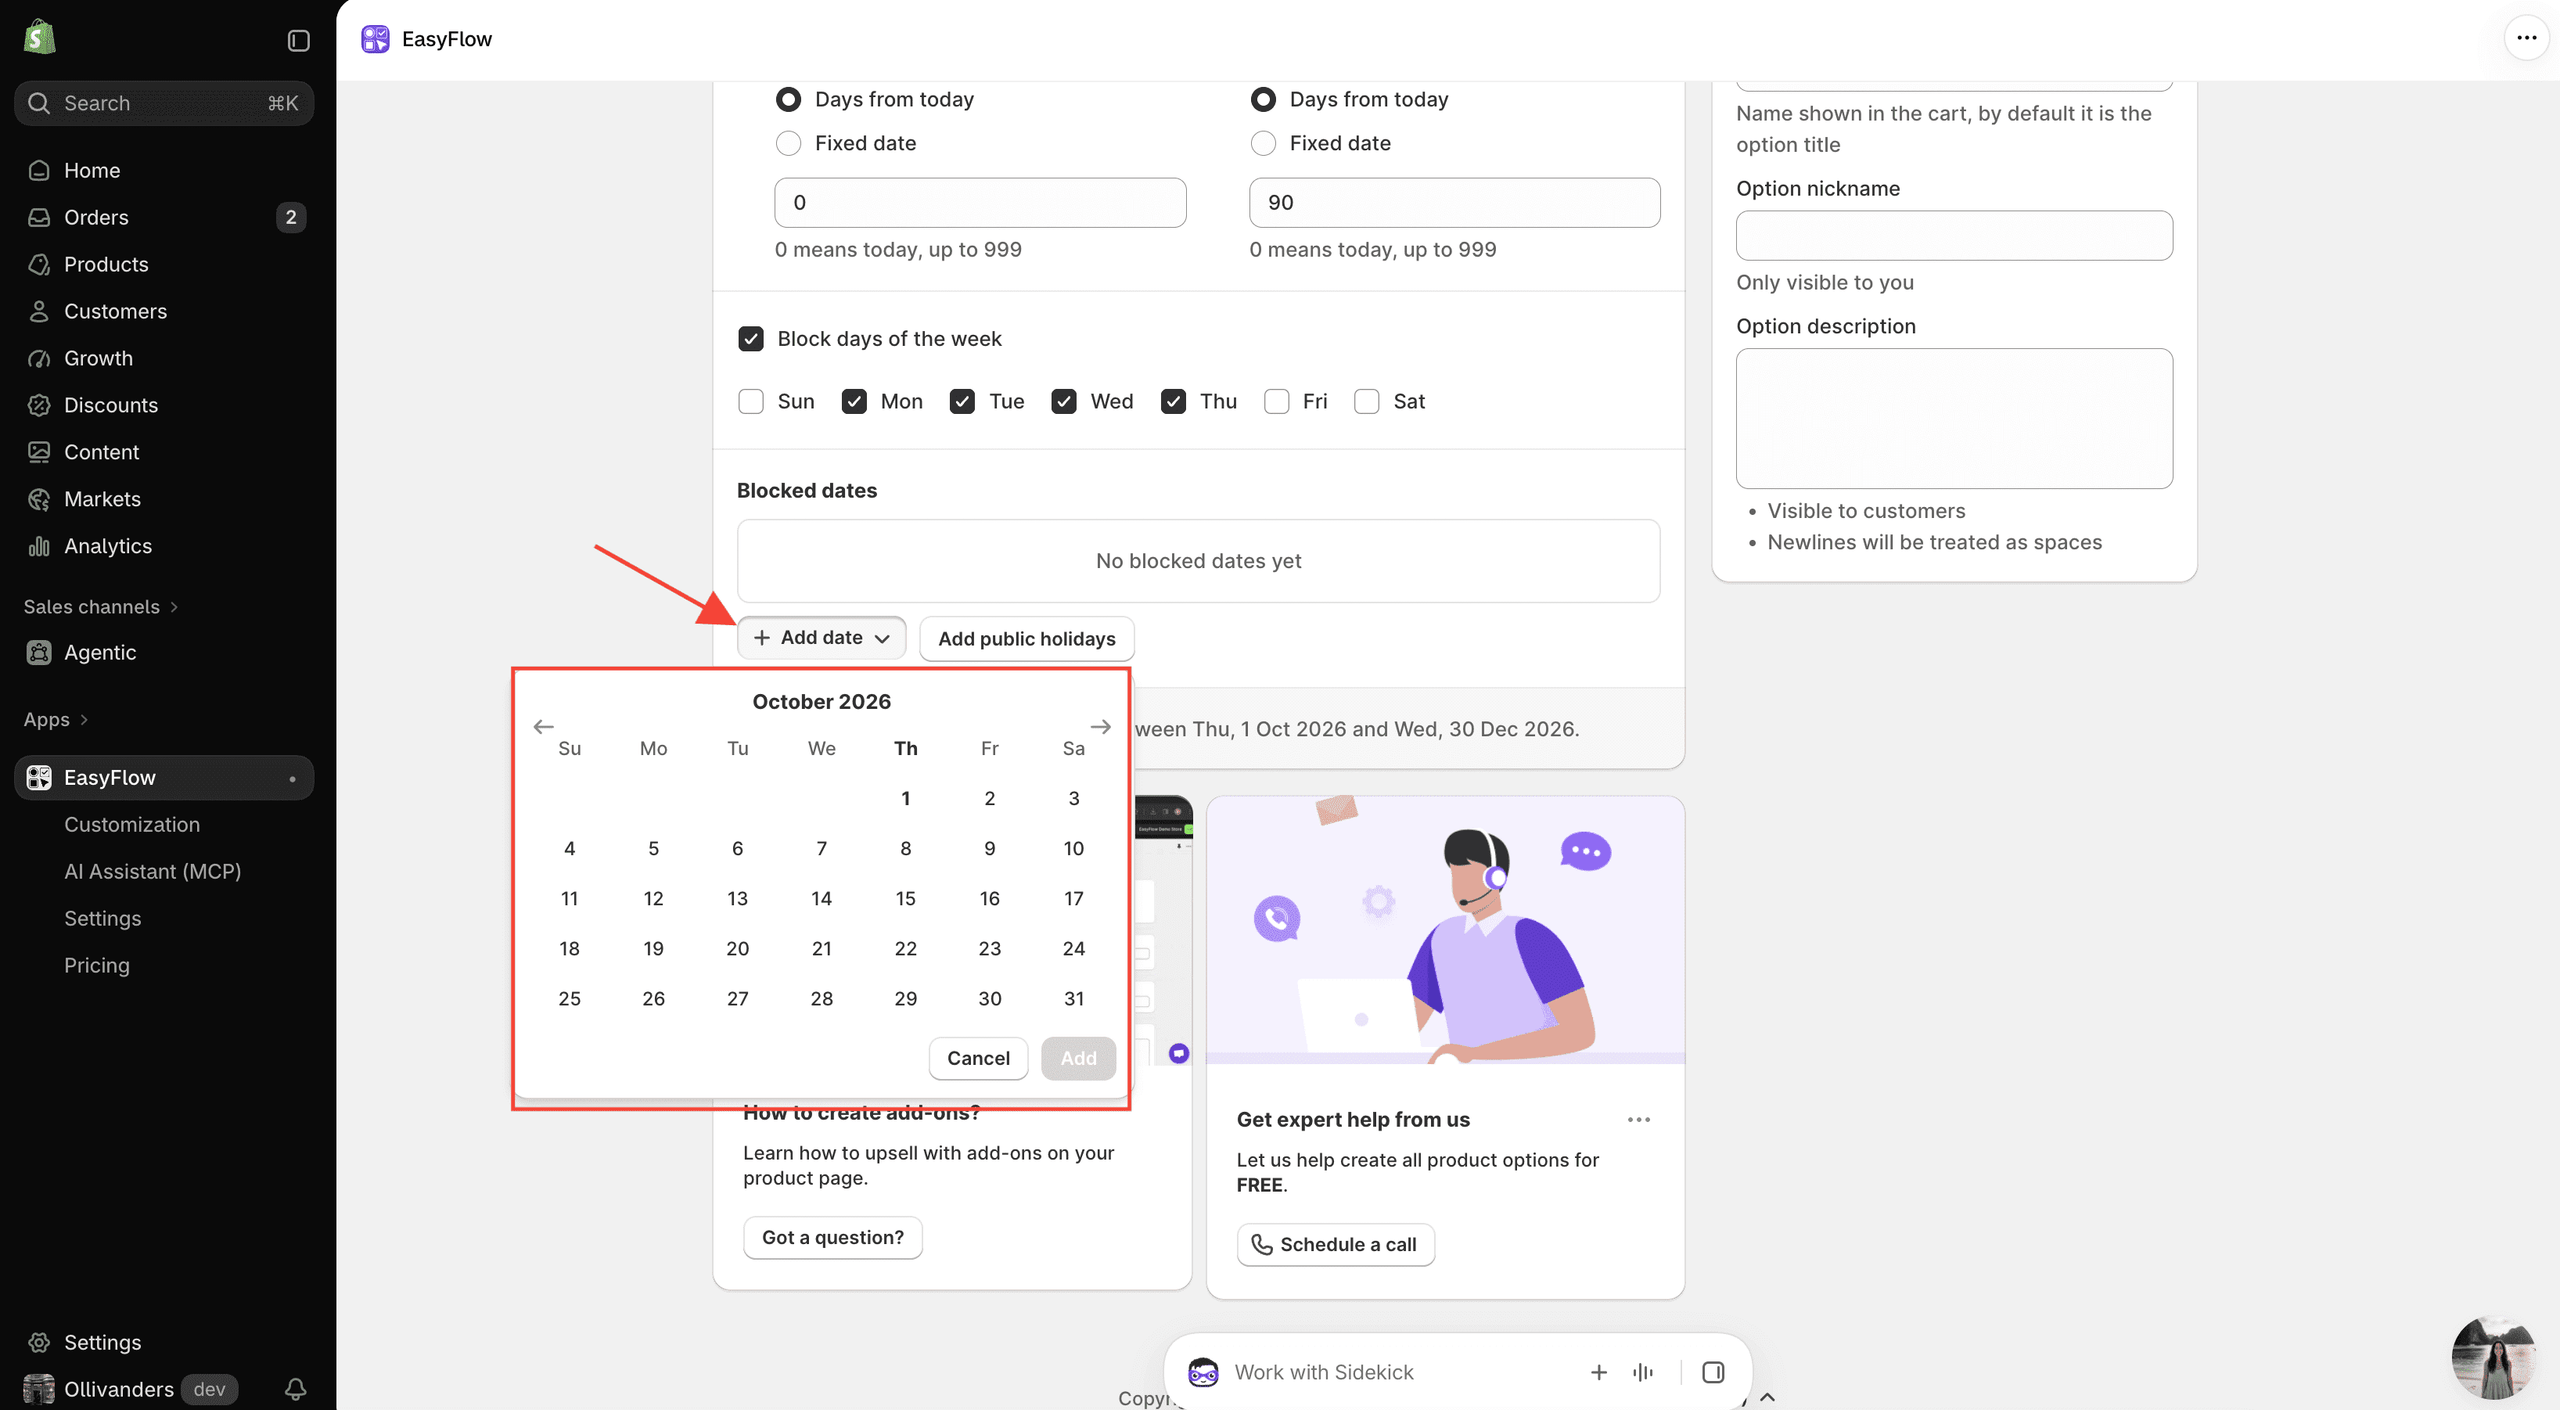
- Click ‘+ Add date’ below the Blocked dates list.
- Pick the date from the calendar and click ‘Add’.
- The date appears in the list, marked Added manually.
Add Public Holidays #
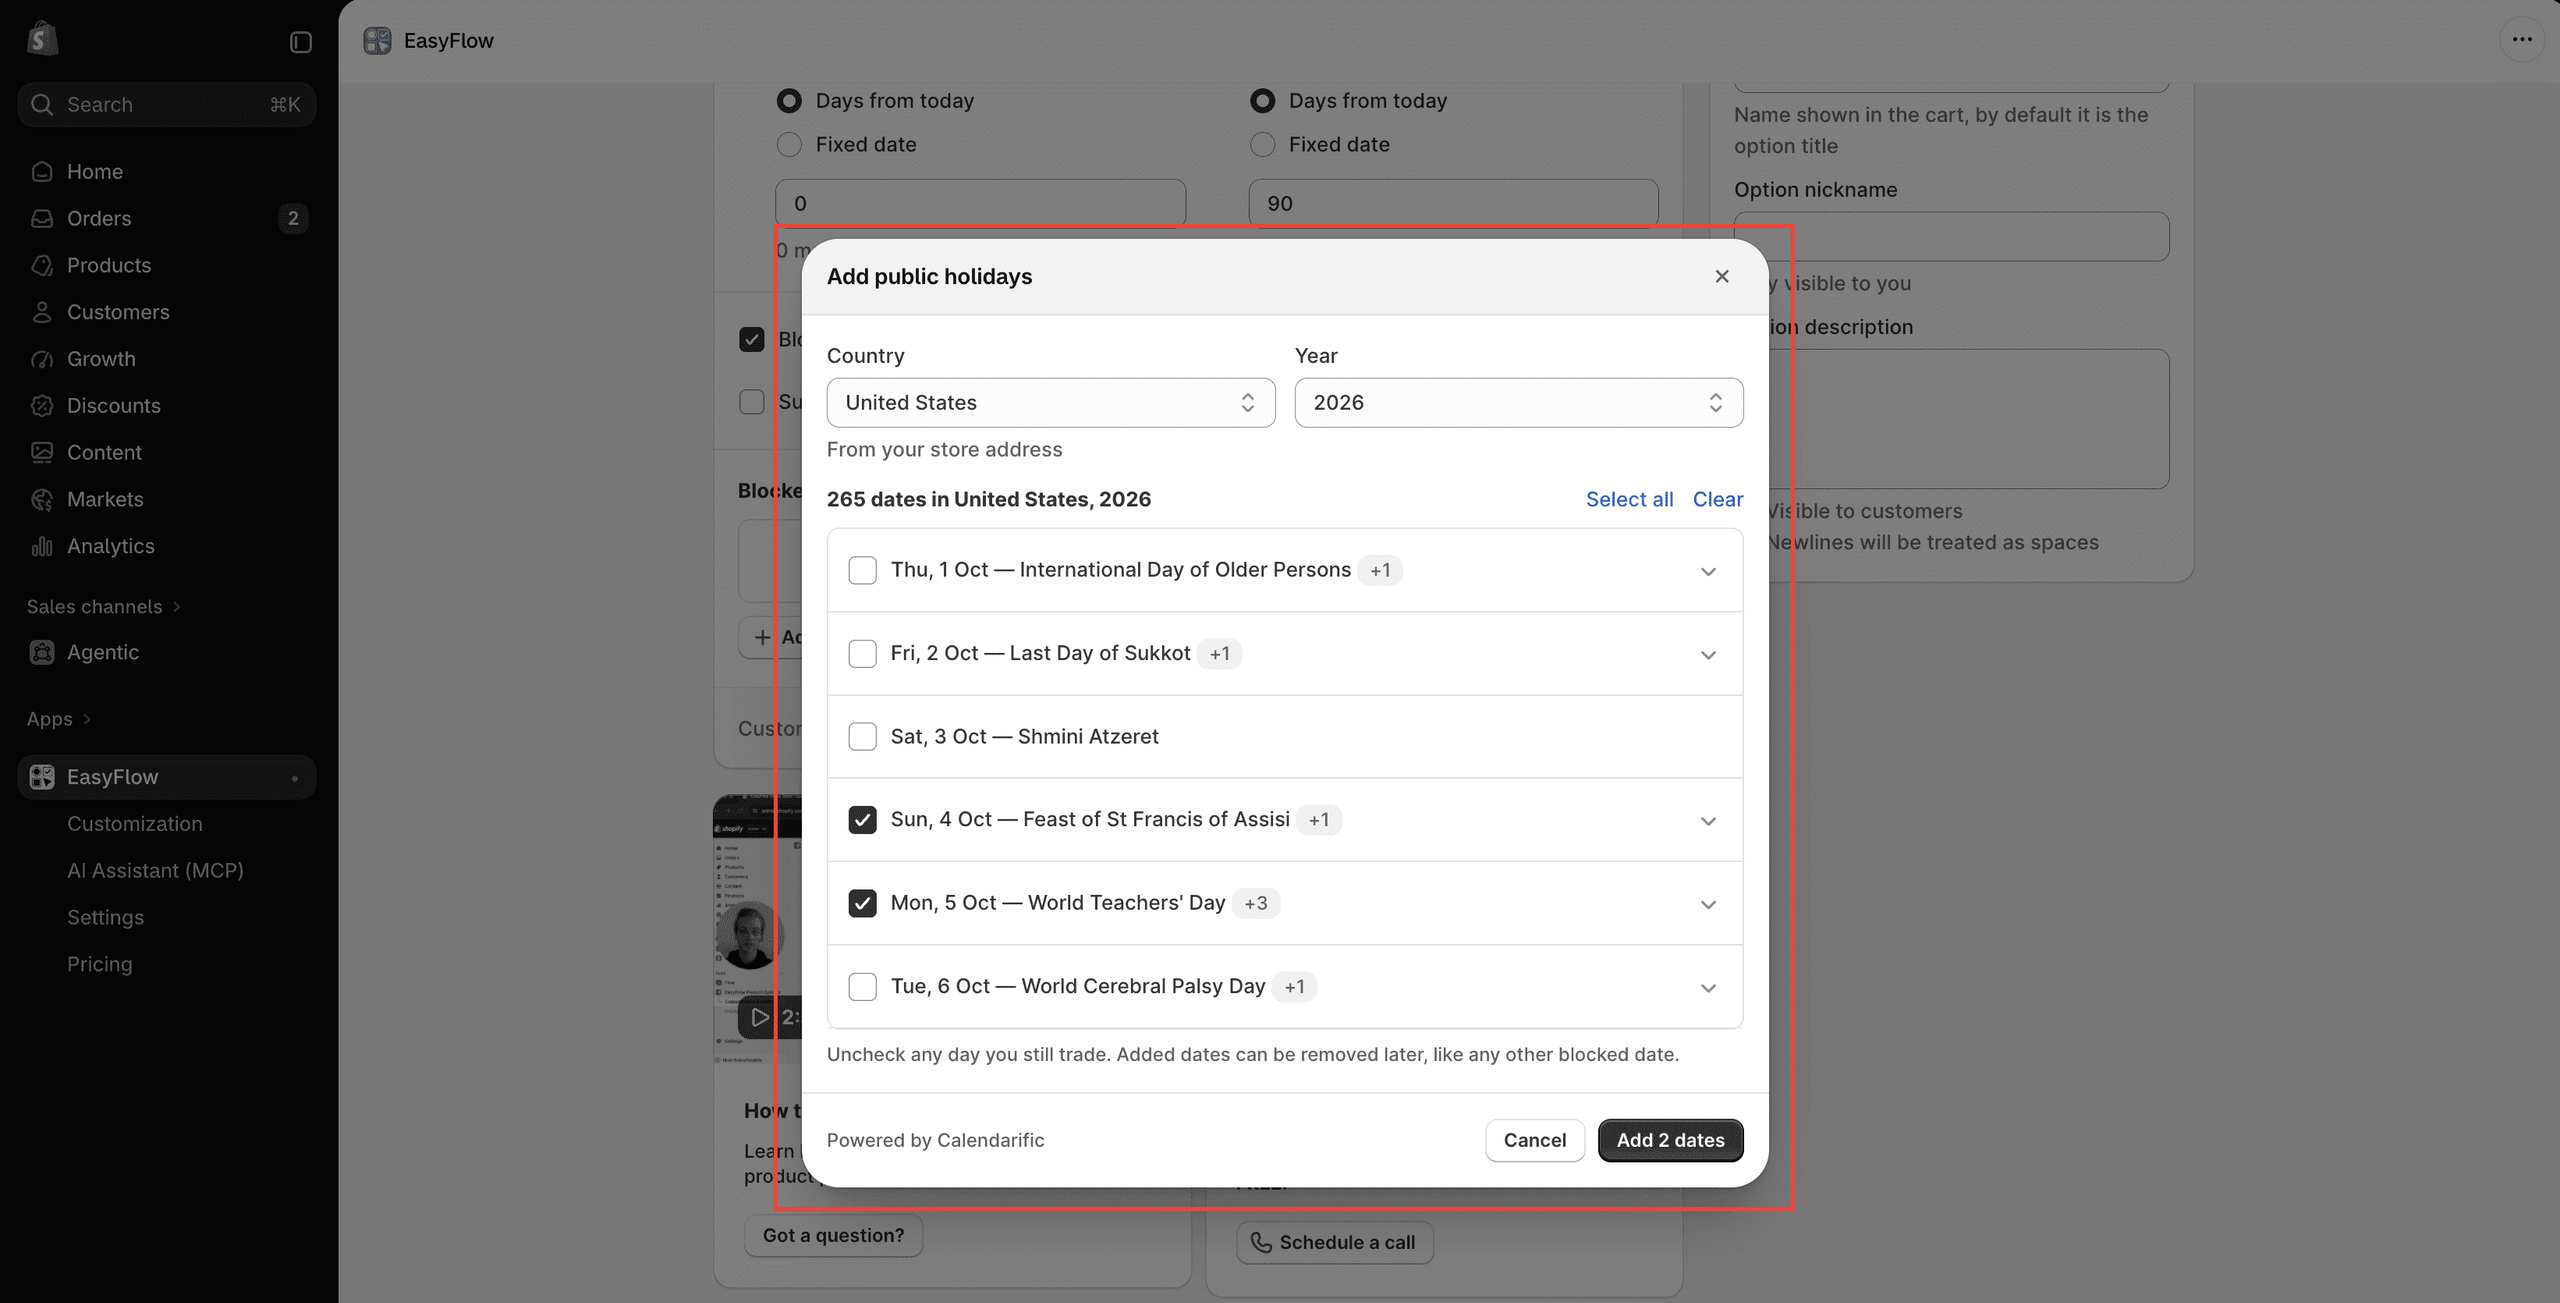
Instead of adding holidays one by one, click ‘Add public holidays’:
- Select your Country and Year. EasyFlow pre-fills the country from your store address.
- Browse the list of holidays for that year and tick the ones you want to block, or use Select all / Clear.
- Click ‘Add [number] date(s)’ to add them to your blocked dates.
Added holidays show in the Blocked dates list with the holiday name and a Public holiday label. Leave unticked any holiday on which you still trade. You can remove any added date later, like any other blocked date.
Check the Availability Summary #
At the bottom of the Date availability section, EasyFlow shows a live summary of your rules, for example: Customers can choose 17 of 32 days between Sun, 27 Sep 2026 and Wed, 28 Oct 2026. Use it to confirm your settings before you save.
The right-hand Preview also lists the rules customers will see under the date field: earliest and latest dates, unavailable weekdays and blackout dates.
How to Configure Input and Additional Settings? #
On the right-hand side panel, you will find a few more settings for the Date Picker.
Input settings
- Required option: Tick this if customers must choose a date before they can add the product to cart and checkout. This is recommended for delivery and booking dates. See How To Make Any Product Options Required in Shopify?
Additional settings
- In-cart name: The label shown next to the selected date in the cart. By default, it is the option title.
- Option nickname: An internal name that is only visible to you, useful when you have several date options, such as Delivery Date – Cakes and Delivery Date – Flowers.
- Option description: Help text shown to customers under the option, for example Orders are delivered between 9 AM and 6 PM. Newlines are treated as spaces. See How to Add Help Text or Description to Product Option in Shopify?
How to Save And Assign the Date Picker? #
Once you have configured your settings, click ‘Save’ in the Unsaved changes bar at the top of the page. A ‘Option saved’ message confirms that your Date Picker is stored.
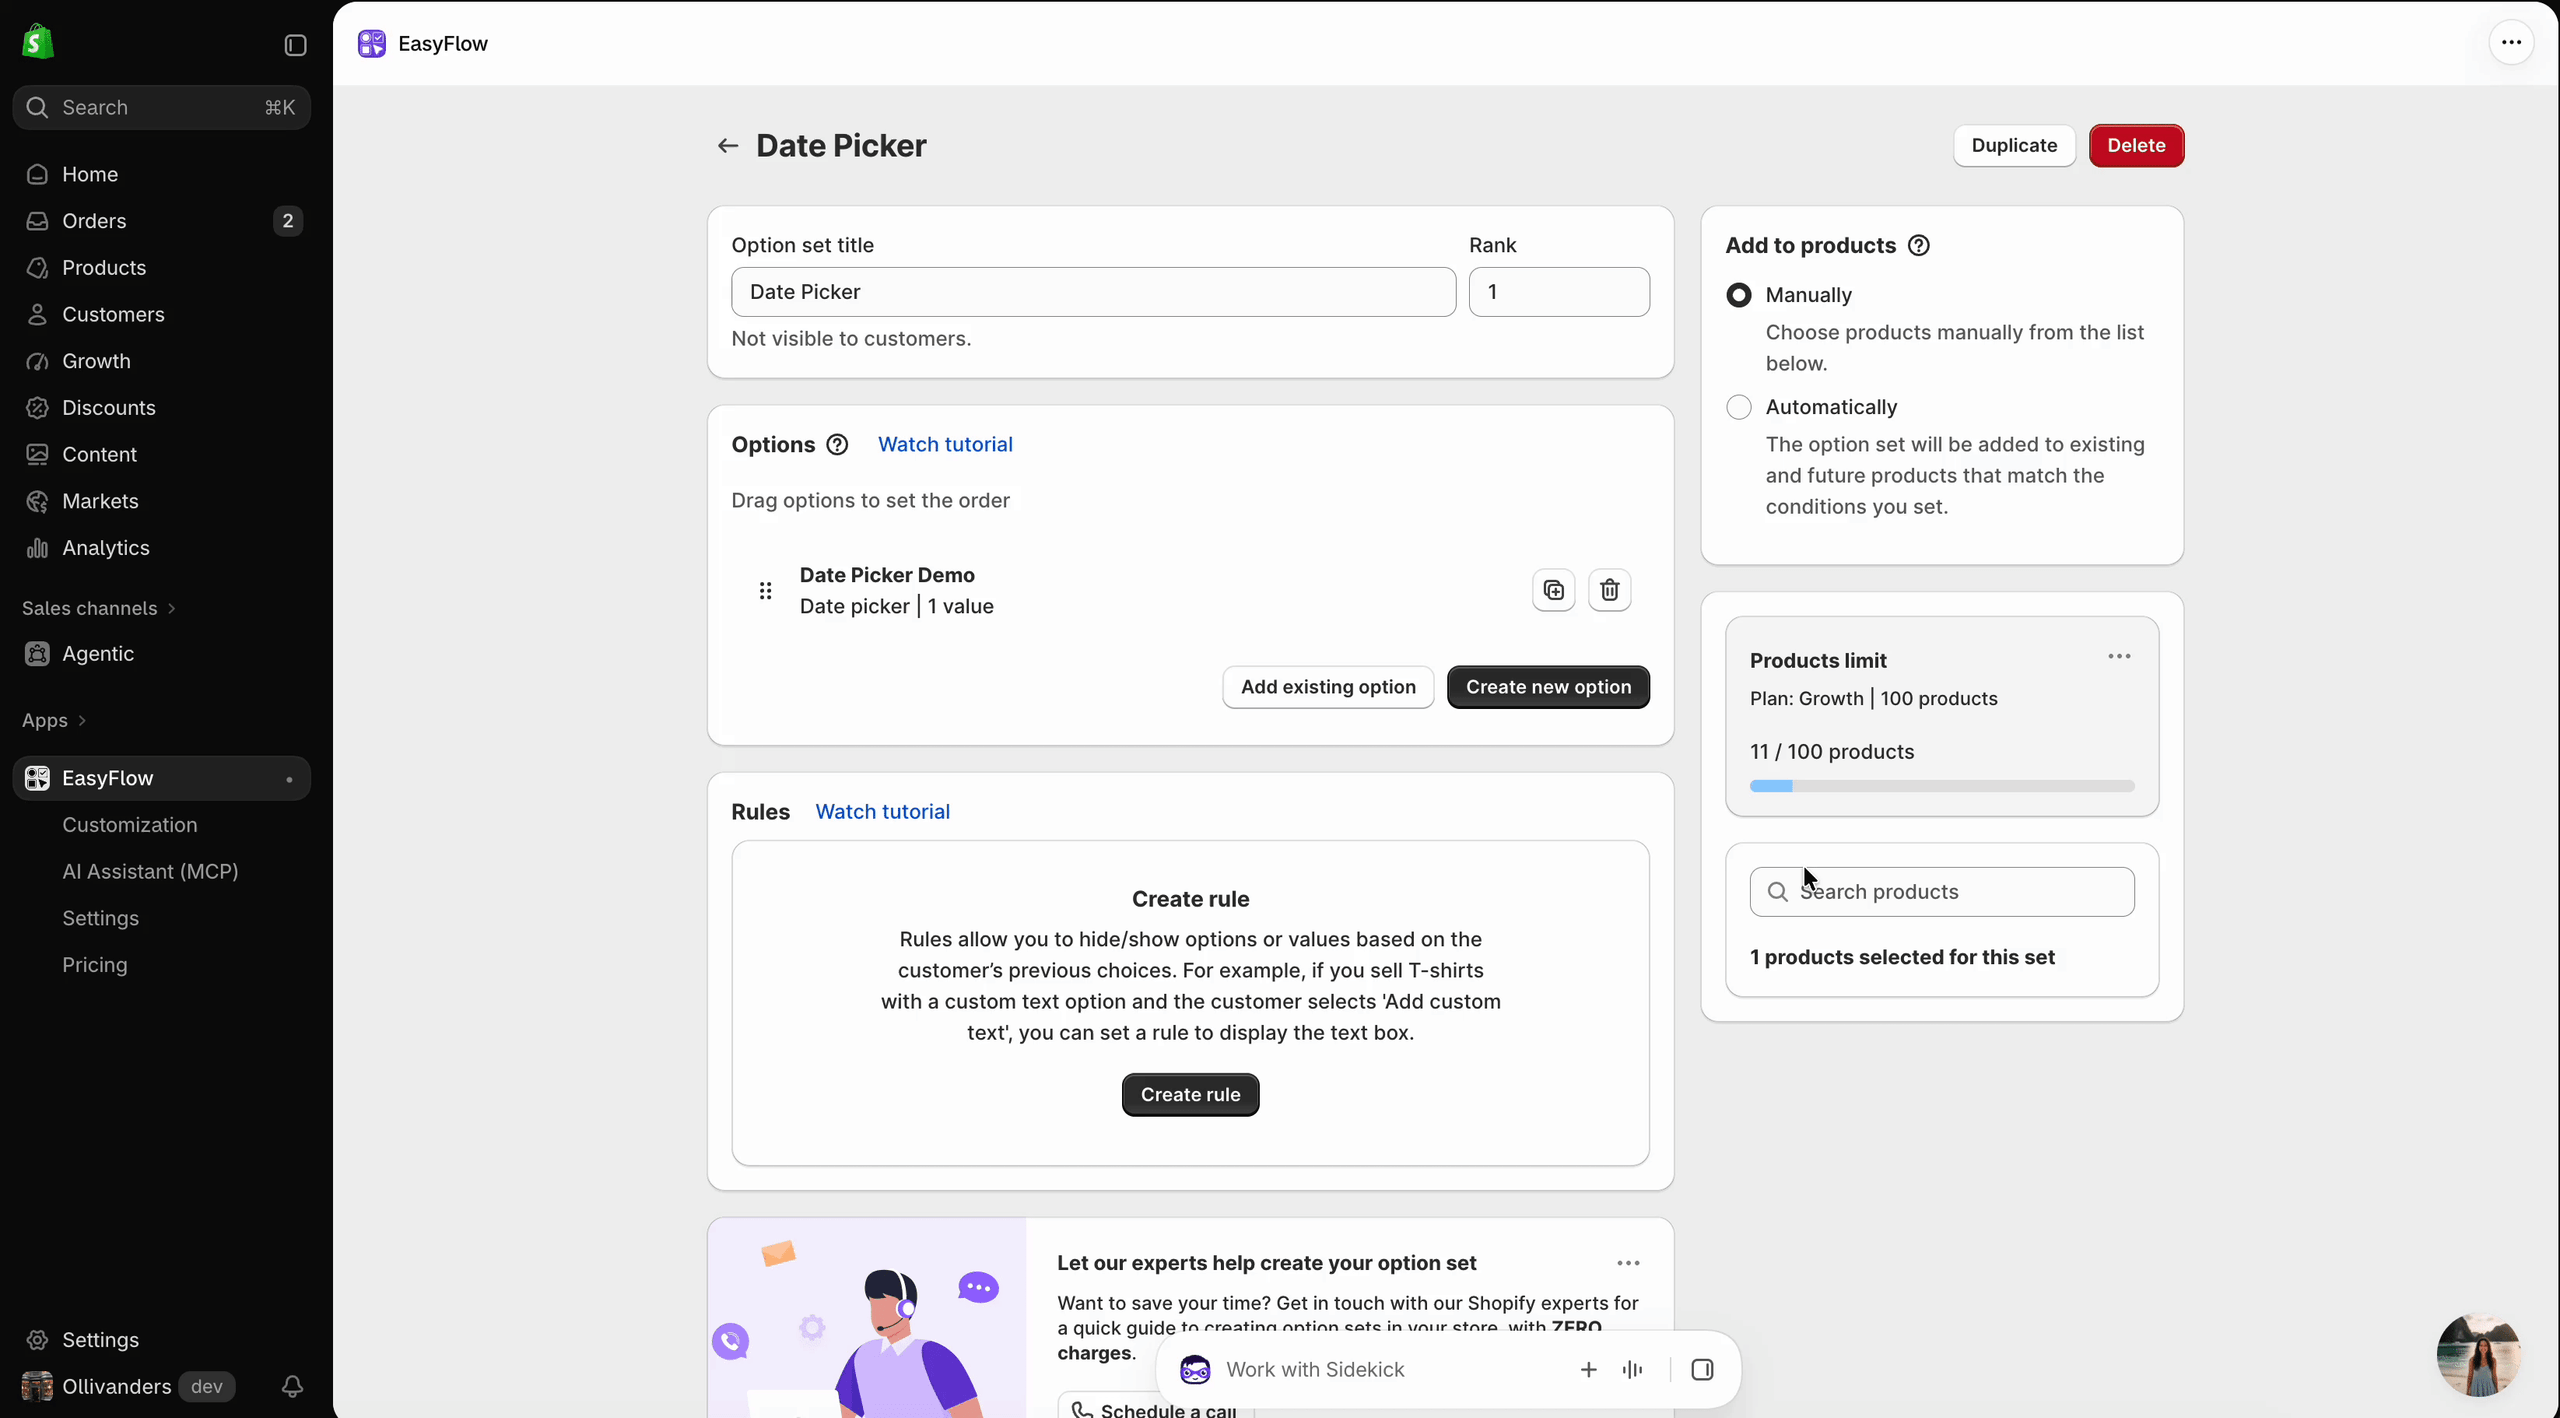
Next, add the Date Picker to an option set and assign it to the products where customers should choose a date. See How to Set up an Option Set for Products in EasyFlow?
Make sure the EasyFlow app block or app embed is active on your theme so the option appears on the product page. See How to Show Options on Storefront in Shopify?
Final Outcome #
When customers visit a product page with the Date Picker, they will see a date field with a calendar. Only the dates allowed by your Date availability rules can be selected, while blocked weekdays, blocked dates and holidays are unavailable.
The chosen date is added to the cart line item and passed on with the order, so your team can see it in the order details in your Shopify admin. To also show it on packing slips and order emails, see How to Show Options on Packaging Slip and in Order Confirmation Email?
Frequently Asked Questions #
Is the Date Picker a PRO feature?
The Date availability settings (limiting dates, blocking weekdays, blocked dates and public holidays) require EasyFlow PRO. See How to Upgrade the EasyFlow Plan?
What does “0 means today” mean?
When using Days from today, the number is counted from the current date. 0 is today, 1 is tomorrow and 31 is 31 days from today. The window moves forward automatically every day.
Should I use “Days from today” or “Fixed date”?
Use Days from today for ongoing orders like deliveries, so the window always stays current. Use Fixed date for seasonal or one-off sales, such as pre-orders for a single event.
Can I remove a blocked date or holiday later?
Yes. Any date in the Blocked dates list, whether added manually or as a public holiday, can be removed at any time. Save the option to apply the change.
Can I charge extra for choosing a date?
Yes. Enter an Add-on price or link an add-on product in the Price section.
Can customers pick a time as well as a date?
The Date Picker collects a date only. To collect a time slot, add a separate option such as a Dropdown or Radio button with your available time slots.
Where can I see the date a customer selected?
The selected date appears on the cart line item and in the order details in your Shopify admin.
Why doesn’t the Date Picker show on my product page?
Check that the option is saved, added to an option set assigned to that product, and that the EasyFlow app block or app embed is enabled. See Why My Options Do Not Show on the Product Page?
This is how easily you can configure the Date Picker in Shopify with EasyFlow. With earliest and latest dates, blocked weekdays, blocked dates and one-click public holidays, customers can only pick dates you can fulfil.
If you are feeling stuck at any step, feel free to reach out to our customer support team; we are always happy to help.


